On a ship, every system has one purpose — safety. The tank vent check valve is no exception. It may look small, but it plays a vital role in preventing fuel, ballast, and water tanks from overpressure or vacuum damage.
But like all marine equipment, these valves need regular inspection and testing to ensure they function properly. In this guide, we’ll explain how to test a tank vent check valve, why testing matters, and what you should look out for — in plain, practical terms.
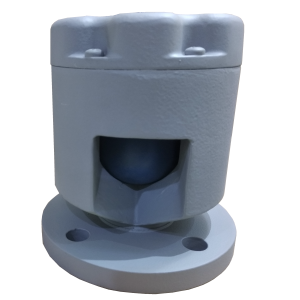
Understanding the Tank Vent Check Valve
A tank vent check valve is installed at the end of a tank vent line, often with a flame arrestor or air vent head. Its job is twofold:
-
Vent excess pressure — when tank pressure rises, the valve opens to discharge air or vapor.
-
Prevent backflow or seawater ingress — when external pressure (like waves or rain) pushes in, the valve automatically closes.
Most marine versions are made of bronze, stainless steel, or aluminum, and contain internal discs or balls that move freely depending on pressure direction.Testing ensures that these moving parts work correctly and that the valve seals completely when closed.
Why Regular Testing Is Critical
Over time, tank vent check valves face saltwater corrosion, mechanical wear, and buildup of salt crystals or oil residues. These can affect sensitivity and sealing.If the valve fails to open, pressure may build up — potentially causing tank deformation. If it fails to close, seawater or rain may enter, contaminating the stored medium.
That’s why marine regulations (like IMO and class societies such as DNV, LR, ABS) require regular testing and maintenance. Proper testing verifies:
-
①The valve opens at the correct set pressure.
-
②The closing mechanism functions correctly.
-
③The seal remains tight under backpressure.
Step-by-Step: How to Test a Tank Vent Check Valve
1. Preparation and Safety First
-
①The tank is isolated and depressurized.
-
②Proper permits and safety measures are in place.
-
③All pipes are drained and no flammable vapors are present.
Clean the valve exterior, removing any dirt or salt buildup. Then remove the valve from the vent line for bench testing.
2. Visual Inspection
-
①Corrosion or pitting on the valve body.
-
②Cracks, dents, or deformation.
-
③Blockages from salt, paint, or oil.
-
④Smooth movement of internal components (disc, ball, spring).
If the internal mechanism feels sticky or jammed, clean it thoroughly using mild detergent or ultrasonic cleaning. Replace any damaged seals or springs.
3. Leak Test (Seat Tightness Test)
-
①Connect the valve outlet to a low-pressure air source (0.5–1 bar).
-
②Apply air pressure in the reverse direction (simulating backflow).
-
③Use a soap solution or pressure gauge to detect any leakage.
A correctly functioning valve should remain fully sealed. Any continuous bubbling or pressure drop indicates a leak — meaning the sealing seat or O-ring needs replacement.
4. Opening Pressure Test
Now it’s time to confirm the cracking pressure (the pressure at which the valve begins to open).
-
Mount the valve on a test bench with the inlet connected to an adjustable air source and outlet open to atmosphere.
-
Gradually increase air pressure while observing the valve.
-
Record the exact pressure where the disc or ball lifts.
Compare the reading with the manufacturer’s specified cracking pressure — typically between 0.1 to 0.3 bar for marine vent valves.If it opens too early, internal springs may be weakened. If it opens too late, the valve may be contaminated or misaligned.
5. Re-Seating (Closing) Test
①Once opened, reduce the test pressure slowly. Observe when the valve reseats and closes completely.
②This point is known as the reseating pressure. It should be slightly lower than the opening pressure — ensuring smooth operation without oscillation or leakage.
③If the valve “chatters” (vibrates between open and closed positions), that’s a sign of improper spring tension or excessive wear.
6. Functional Flow Test (Optional but Recommended)
-
①Connect the valve to a flowmeter and simulate real venting conditions.
-
②Observe air discharge flow rate, noise, and vibration.
Stable airflow and consistent behavior indicate the valve is functioning correctly under working conditions.
Maintenance After Testing
-
①Clean and dry the valve.
-
②Lubricate the moving parts (if applicable).
-
③Replace any worn gaskets, seats, or O-rings.
-
④Reinstall the valve with new fasteners and gaskets.
Always recheck alignment after installation. The vent line should slope slightly to prevent water accumulation, and the valve should face upward for proper operation.
Recording and Certification
-
①Date of test
-
②Valve serial number
-
③Opening and reseating pressures
-
④Observed leaks or abnormalities
-
⑤Technician’s name and approval signature
These records are often reviewed by marine classification societies during inspections. Keeping an accurate log ensures compliance and traceability.
Common Testing Mistakes to Avoid
-
①Using too high test pressure — may damage seals or deform internal parts.
-
②Skipping cleaning — debris inside the valve can cause false test results.
-
③Ignoring spring orientation — reversed installation changes cracking pressure.
-
④Not checking flame arrestors — clogged screens reduce venting efficiency.
Always follow the valve manufacturer’s instructions and class society requirements for testing intervals (usually every 12 to 24 months).
Post time: Oct-28-2025